Sunday, January 29, 2017

Tying instructions for my top foam pattern.


I'm gonna send you to the link for the tying instructions.  As one of my top pages, I'm gonna just leave the instructions where they are placed for organic web results.  I created this pattern years ago but refined it with the River Road Creations Chernobyl cutter.  The page was updated today.  You don't need dubbing or wings or special eyes or antennae.  That's just to catch fishermen.  All you need is a basic pattern that is effective.  But you can create this pattern however you want.


Let me know if you have any questions.

Tight Lines.

*No, this isn't a copy of any pattern.  There are those patterns out there who are similar and were created several years later

Friday, January 27, 2017

My first fly-fishing article.


I got to be a contributor to So Much Water Magazine.  I was put onto these reads from Drew Ross at http://looknfishy.blogspot.com/  It's a nice little article from last spring about chasing Smallies in the Ozarks.

https://www.joomag.com/en/newsstand/so-much-water-vol-2-issue-2/0353449001450972859

This is a great publication.  I love these digital magazines that you can read anywhere.

Steeve's Los Alamos Ant - foam fly pattern for bass and bluegill


I learned about this pattern in about 2008 or so.  The pattern is from "Tying Flies with Foam Fur and Feathers" by Harrision R. Steeves III.  I began using the Los Alamos Ant for panfish with very succesful results.  I started out using size 8-10 patterns and then moved up to 6.  I used to drift this fly on the Middle Fork of the White River for large Pumpkin Seed and Bluegills.  The Spotted Bass of Richland Creek took to this fly very well.  I use basic streamer Mustad hooks supplied by my father but I will also use larger gap hooks such as those from Allen Fly Fishing and Gamakatsu.


I was an idiot and for some reason thought that cutting the tip off the bottom piece of foam (step 6) looked stupid and I just fished it with inverted triangles and an indicator on top.  Pictured above.

Materials


  • 2 mm foam
  • rubber legs
  • chenille or peacock herl
  • whichever hook you choose
  • marker for eyes or spots on body


1. Cut two triangles from whichever color combo you choose for this pattern.  It took me several attempts to get the proportions correct.  


2. Lay down a good layer of thread and then tie in legs.  If needed, trim legs.


3. Tie in foam - reverse the triangles - make sure they lay down opposite each other with the top foam pointing up and back.

4. Tie in chenille or herl.  I believe the original pattern calls for herl but I always use chenille.  Leave enough space to secure the front of the foam body.


5. Secure foam.  


6. Trim bottom piece of foam back at the tip of the eye.


7. Tie in legs - secure against foam body.  


8. Make several half-hitches around the body and legs or wind thread back to shank and whip-finish.  

9. Make sure to apply adhesive on thread wraps at the rear and front of the fly.  Do your best to keep adhesive off of legs because it will mess them up such as hardening or warping.

10. Draw on eyes.  Give this fly some life!  You can also choose to design a pattern on the body.  OR - as I do sometimes, design the pattern on the foam before cutting it.  You could draw black eyes with yellow pupils and have a yellow body with black spots (try crystal chenille or something flashy for the underbody) - the combos and designs are endless and fun.

Let me know if you have any questions.

Tight Lines.

Thursday, January 26, 2017

Smallie Hopper


Another creation with the help of the Beavertail Cutter from River Road Creations.  I am more than certain this pattern will land a fish. I have tossed hopper after hopper to fish and they all have landed bass or panfish.

Materials


  • .5 mm green foam (1/2 mm)
  • 2 mm tan foam
  • 2 mm yellow foam
  • rubber legs
  • Gamakatsu b10s hook


1. Use your Beavertail Cutter to press out tan and yellow foam bodies from 2 mm foam.


2. Tie a knot in 2 pairs of legs.


2. Lay down several layers of thread on the shank.  Some people prefer to dub the shank.  It's up to you but I don't mess with it because the fish don't care.

3. Tie in foam pieces at first segment.

4. Add legs


5. Trim legs.


6. Wind thread forwards and secure body at the next segment.  Make several wraps at the least.  Don't tie in legs yet.


7. Cut out the wing from .5 mm foam with a Size 6-8 Chernobyl Tapered Foam Cutter (or just cut one by hand) and tie in about a millimeter or two short from the back end (if you want or just extend it same length as body - I don't like a long wing).  Trim wing after tying in - NOT BEFORE.


8. Cut an indicator and tie it in.  Then secure legs.  If needed, trim legs.


9. EITHER - Make several half hitches around the indicator and body or wrap thread to eye and make some whip finishes - It's up to you.

10. Make sure to use plenty of adhesive - preferably Zap-a-Gap along hook shank and thread wraps.


Let me know if you have any questions.

Tight lines.


Wednesday, January 25, 2017

Tying instructions for the "Shucker"


Here are the tying instructions for the Shucker.  I've been getting a lot of requests for it on FB and Instagram.  Great for Smallmouth Bass and other warm water species.  My "go-to" pattern for Smallies.  It just might be original but there are so many patterns out there - I don't know.

*I've made changes to the pattern - Allen B200 size 10 bass hook and nickel or brass eyes.

http://purposehere.blogspot.com/2013/05/tying-shucker-warm-water-fly-tying.html

Here is a blog post of an outing with the Shucker.

http://purposehere.blogspot.com/2013/07/shucking-smallmouth-bass.html

Good luck tying and let me know if you have any questions.

Tight lines.

Thursday, January 19, 2017

Rainy's Gorilla Body Hopper - fly tying instructions


I found some Rainy's Gorilla Bodies on sale for 88 cents.  Never having used them, I figured it would diversify the fly box a bit more and keep me entertained at the vise.  If you don't have any foam cutters or are not looking to spend a few bucks on them, pick up a few of these at the fly shop.  I think they are reglarly priced at just a few bucks.  Good investment for a fun time on the water.  Expirementing with hopper patterns, I figure just about any well tyed hopper pattern will land fish.  After all, there are soooo many hopper patterns at the store, in catalogs, etc.


1. (Using a 4 segment Gorilla body) With razor blade, or scissors, cut slit in foam from about 2 mm past last segment through head - 1    mm deep


2. Wrap thread on hook (Gamakatsu b10s size 6, daiichi, Mustad or whatever you think would work for you) and set bobbin at middle of body.  Make about 10 wraps (depending on thread size).


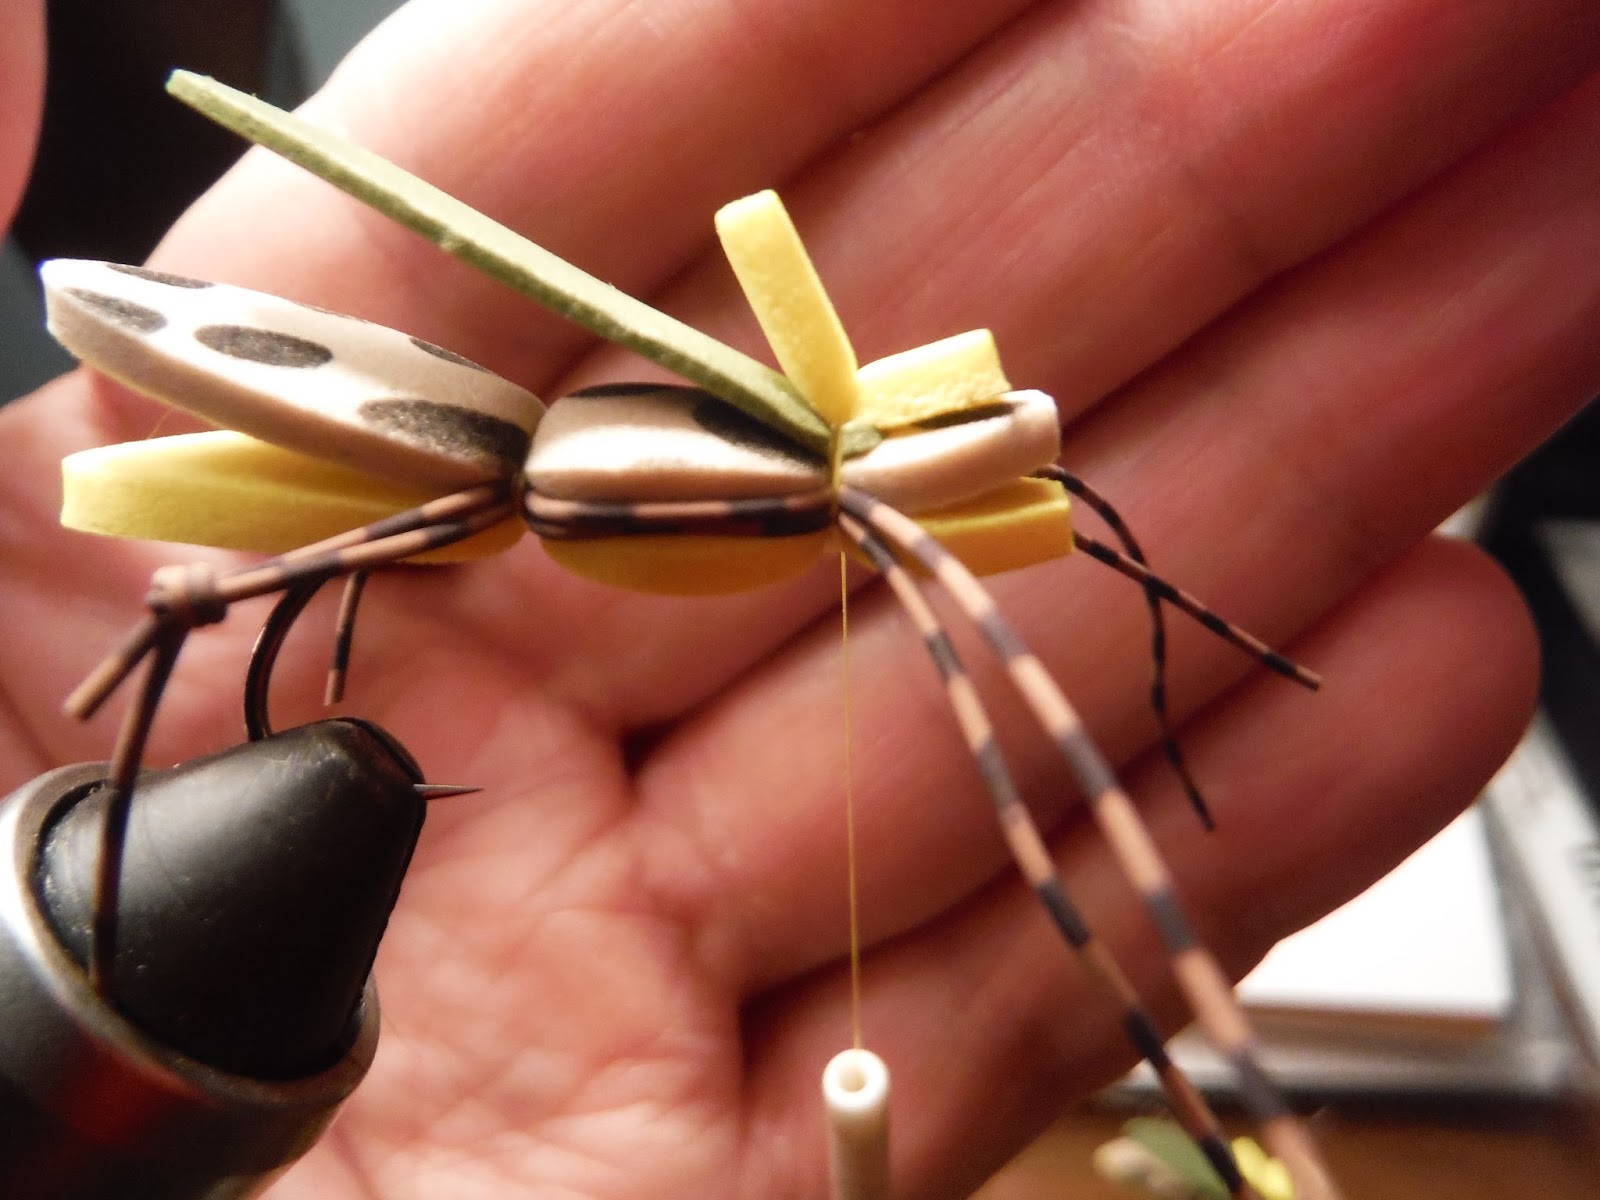
3. Add a leg (1.5" in length) on front side and make several wraps of thread and then do the same on    the far side.


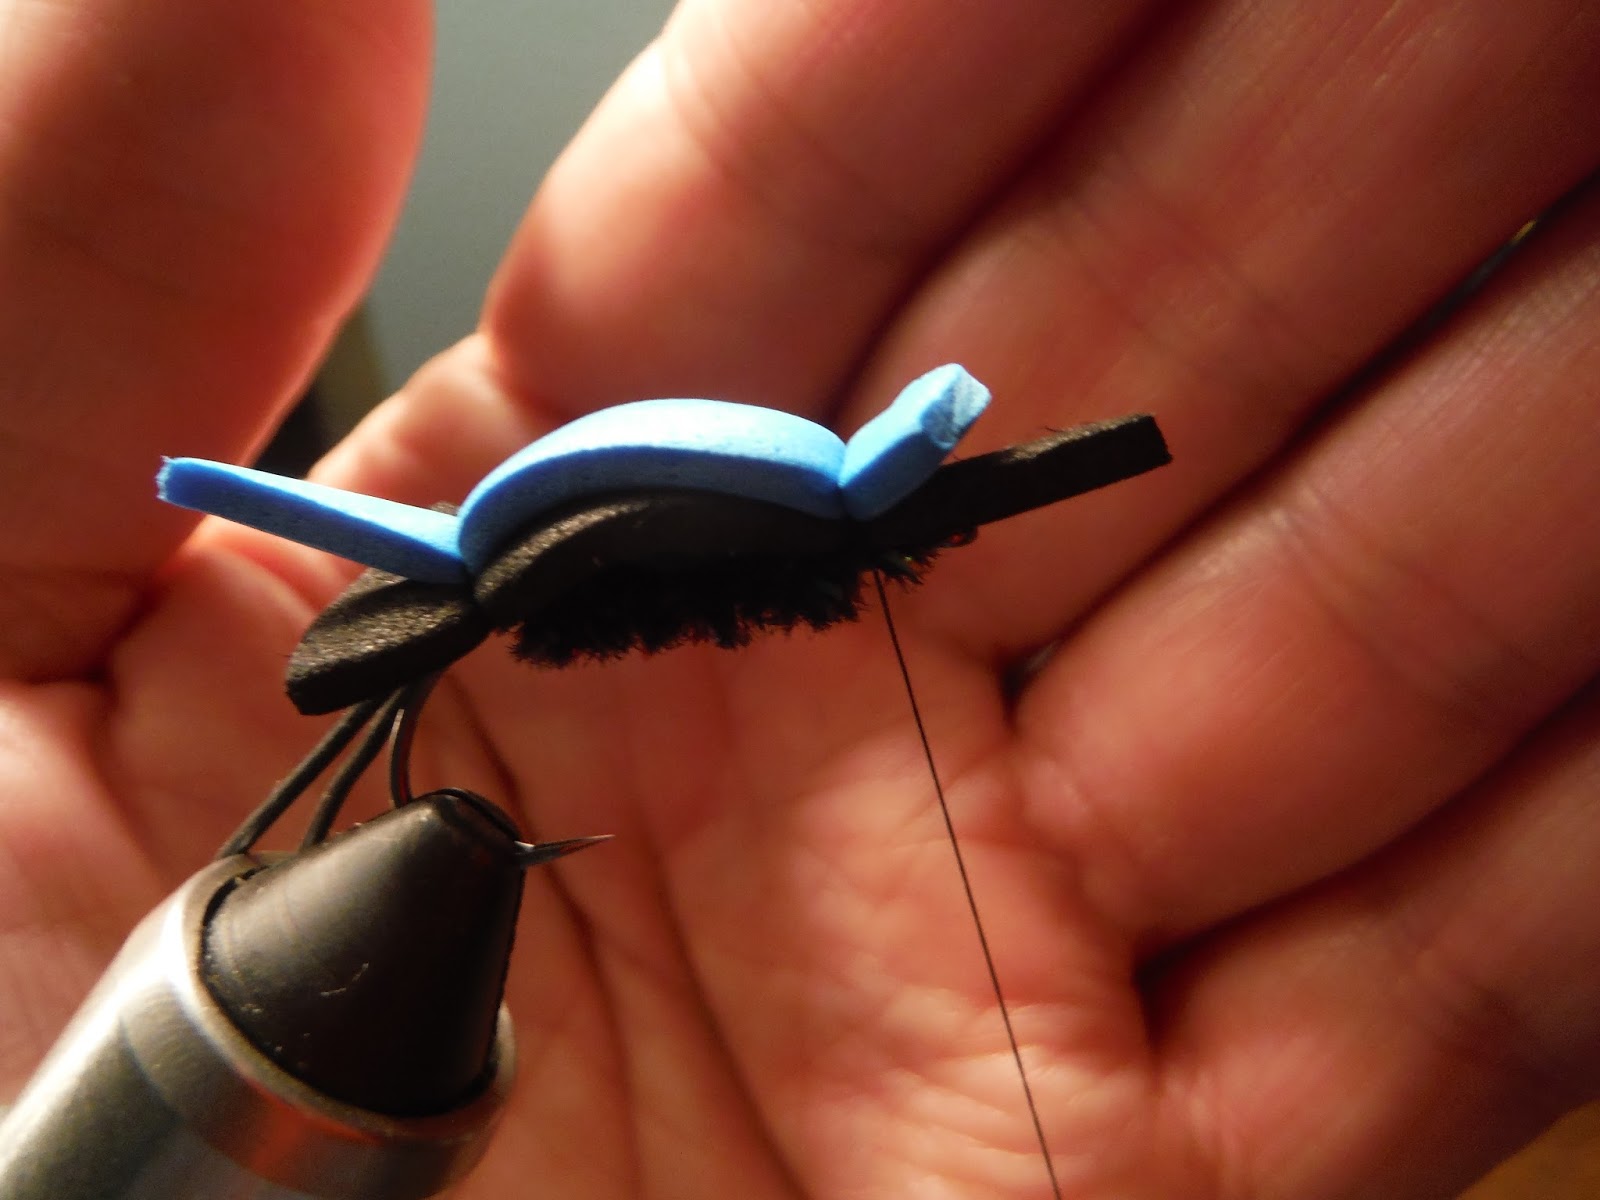
4. Tie in about 1.5" to 2" of antron yarn.  Fold yarn back over abdomen and then make several wraps    of yarn around segment.  Trim to match length of abdoment.  You may have to use a brush to even      out the wing.

5. Tie in foam indicator (cut it several millimeters narrow of the body and then cut a little point into    the front of the indicator and a longer point like an isosceles triangle on the top of the indicator          which will be placed over the wing).  Sometimes, I trim the foam after I finish the body.


6. Wrap thread up to front segment.  Make 6 wraps of thread.  Add legs.  Place front of indicator          down and make several more wraps of thread.


7. Make several half-hitches - I make at least 3 - around front segment (between legs).
 If you are not comfortable make half-hitches around the body, then wind thread to front and do           some whip finishes or wahtever you need to complete your tye.


8. Apply adhesive down hook shank (slit) and at front and rear wraps of thread.  DO NOT get adhesive on the legs, it makes them shrink up or harden or "twonky".


If you desire, add eyes.

One key to landing fish is a proper hook.  I've been using Daiichi hooks but have since moved to a Gamakatsu b10s - just the right gap for smallmouth bass and very sharp.  While I have caught Smallmouth Bass on 2X streamer hooks, wet nymph or dry fly hooks, I was frustrated on several outings when I just couldn't set the hook - maybe it was me but I think a more exposed gap could essentially land more Smallies - or other species.

Let me know if you have any questions.

Tight lines.


Friday, January 13, 2017

River Road Creations Cutters - Review


Those of you that read my blog know that I enjoy tying foam flies. Mainly, I tossed them at panfish and began tying them for bass too. And did I ever slay the Smallies with those Hoppers! The first "foamie" (as I lovingly refer to foam flies) that I ever set eyes upon was the Club Sandwich Hopper at the local Orvis shop. I mainly casted Betts' poppers but when I say that foam fly, I knew what I was walking out of that store with - foam. The Orvis site had tying instructions for the Club Sandwich Hopper. I tyed up a few and then progressed into foam cylinder poppers and Gurglers. Even though I was making deer hair poppers for bass, it was a foam popping bug that hooked my first topwater largemouth bass. 


One tool that helps me to have a clean cut and more refined look to my foam flies is a River Road Creations cutting tool. I've been using them for 5 or 6 years now. It's not just the foam cuttters that have helped me to tye better flies but also videos and forums and just sitting down for hours on end. At one point, I was selling quite a few online. Until I got sick of it, ha.

Today, someone asked me if these Cutters are worth buying?  YES.  You can buy one Cutter or a set.  There are wing cutters and Chernobyl cutters, stonefly cutters, etc.  It even comes with a white rubber pad - "The white cutting pad that comes with your cutter is required to use your cutter - to ensure that it lasts for many, many uses, as well as to protect damage to work surface. Each River Road Creations cutter must be used with the pad provided, or a replacement pad for proper use."

The cutters provide proficiency and an accurate cut.  The lifespan is upwards of 2,500 cuts (bodies) and possibly many, many more.


Even though the cutters can be found on other sites, I buy directly from them.  


Tuesday, January 10, 2017

Lamson Konic II Review - Lamson Fly Reels


Lightweight, dependable and a lifetime warranty - all the things you look for in a reel.  No, this reel is not made in America and no longer in the Lamson line-up.  However, the Lamson Konic can still be purchased as a new item and at a great price.  I had the Lamson LP 1.5 - from back in the day and loved it!  Great sound, light weight and lovely drag.  I used it for trout, smallmouth, panfish - and more - all on a rod my father built for me.

Lamson LP reel


"Konic delivers smart design and high performance in Lamson’s most affordable reel. The same, super-smooth, fully sealed conical drag system and stainless roller clutch used in our more expensive reels are matched with machined components and pressure cast ALDC12 aluminum alloy spool and frame. Konic is anodized then finished with a 100% solid polyurethane coating to resist gouging and abrasion."


Sure, you can buy some pretty darn nice brand-new reels for about what these Lamson Konics II are selling for but it's the lightness of the reel that attracts me.  WHY?  I want a light combo - I bought a TFO Signature Series II and an Allen Trout 2 reel.  Honestly, the reel was a bit heavy - even for CNC and even for a reel that balanced out with the rod.  I have a GLoomis Adventure 3 that is obviously smaller than the Trout 2 that is very lightweight.  I have even used my father's GLoomis Adventure 5 and remember that is almost seems to weigh as much as my Cortland Crown II.  I'm not knocking Allen too hard and I love the Trout 2 drag - heck I even have the Allen ATS.

Waterworks Lamson Konic II Fly Reel
Specifications
ModelWidth
(in.)
Diameter
(in.)
Weight
(oz.)
Line Wt.Capacity
(yds.)
1.5 II1.00"3.10"4.403-4 wt.WF4+100 (12)
2 II1.10"3.40"4.705-6 wt.WF6+100 (20)
3.5 II1.22"3.70"6.107-8 wt.WF8+200 (20)
4 II1.25"3.90"6.809-10 wt.WF10+240 (30)

Drag - Sealed.  Easy to configure from RHW to LHW (which I've done cuz I used to adjust drags with my left hand) smooth (and obviously depends how you control the drag and play the fish) - and obviously will be a smooth drag cuz it's Lamson and when you spend at lesat $100 on a reel, the drag will be proper.  I used the drag every now and again but mostly on the trout river with those big Brown Trout and that little fiberglass rod.  It's a hansome reel that will match most any rod - it's not orange or pink or blue.  And it's not a $300 reel that you'll cry over when you fall and scar up the anodized finish, lol.  Lamson obviously focuses all their attention to reels and provides a quality product.

Spool - No knobs to unscrew or switches to push.  Firmly pull the reel off or snap into place.

The Lamson Konic II paired with my TFO Clouser provides a lovely lightweight combo - one of which I don't feel like I have to grip hard or think about the weight of the reel on the back of my palm (and I don't have a sore palm from gripping the rod hard) - and I swear the Allen Trout 2 (5.42 oz.) and TFO Signature Series II were balanced.

Tight lines.

Friday, January 6, 2017

VEDAVOO Beast Sling Review


Fishing, hiking, biking, walking the dog - I have taken the Vedavoo Beast Sling with me.  I take water, doggy bags, load it with several groceries at the store, take snacks, fill it with my papers and lunch for work . . . even thrown in some fly boxes too.


Photo -Vedavoo 


I bought this Beast Sling pack to haul more items than with my Cabela's sling pack (which I still use) so that I could be more prepared on those long wade fishing trips.  I take a tensor bandage, drink, snack, fly box(es), eye drops, Leatherman tool, camera, phone . . . . and after 6 hours, it is more comfortable than the other sling pack when fully loaded.  Plus, it's main design feature is that it holds Cliff's Bugger Beast Jr.

Watch Vedavoo's video.

On my Beast Sling, I hang my net and my camera too.  I have some carabiner clips for forceps, clippers, Leatherman tool, etc.  And, you can also strap on your rod case.  It can be customized for Left Shoulder or Right Shoulder.  It's a versatile sling pack.


I love my Vedavoo Beast Sling.  It's what I spent last Christmas' money on.  This past Christmas, I bought something lovely on which I'll give a review after it gets some use.

Tight lines.


Thursday, January 5, 2017

Cabela's Advanced Anglers Sling Pack REVIEW

If you are looking for a great deal on a sling pack, then this is the one for you.  As this pack (retails for $29) regularly goes on sale a few times each year, it can be purchased for as low as $19.99 - right now it's $20.99 on the Cabela's web site.

 The Cabela's Advanced Anglers Sling Pack has a couple of little slots on the pack for which you can loop a net cord through and perhaps some carabiners. The sling pack is light and dries out quickly. There is space enough for a few small to medium size fly boxes and perhaps a bottle of water (or attach water bottle on exterior) and snack. It's got a band that keeps the pack from sliding around when you bend over. When sliding the pack around for access into the pouch or pocket, unclasp the band and pull the bag up or down. I'm somewhat a gear minimalist and prefer to keep wading light. If you are looking to save a few bucks and have a proper sling pack, this one is for you.


I can loop my camera through a strap and the fly box is attached to a zipper on a carabiner. The net was looped through a slot hole in the back.


Room enough for a few medium size fly boxes and a Martin fly reel.

Tight lines.

Cabela's Advance Anglers Sling Pack http://www.cabelas.com/product/Cabelas-Advanced-Anglers-Sling-Pack/1571765.uts

Wednesday, January 4, 2017

Pat's Rubber Legs - Nymphing for Bass


This is my second favorite Smallmouth Bass pattern.  When it comes to bass - what's the saying? - "More legs is better".  I use weighted Pat's Rubber Legs - anywhere from a size 10 to 6 and the odd 4 here and there.   I find these flies challenging (but not too much) to tye.  All those legs!  I had to do some shopping around to find the right color legs and chenille - think I found chocolate brown chenille somewhere last year.  Honestly, tying your own PAt's Rubber Legs beats paying around $3 for a fly.


Back when I almost exclusively fished for Panfish on small creeks, I used to carry different trout nymphs and those found in Tom Nixon's Fly Tying and Fly Fishing for Bass and Panfish - such as the Jeremiah Nymph 1 and Nymph 2 - of which I can't remember because I gave the book to someone else.  Obviously, it mimicks a Stonefly but I also would like to think the fish believe it's a Hellgrammite.  I guess you could tie in some marabout or rabbit strip.  Mainly, I just drift the fly but I will occassionally strip it.

I would give a tying recipe or instructions but this video that I found at the Die Fische Blog is the best tying video I have seen on Pat's.  


Just as Die Fische gives credit - please note it was made by Tightline Productions.

Can't wait for warmer weather - love wet wading.